Between Christmas, Thanksgiving, illness, house projects, lack of snow, and a laundry list of other dumb excuses, we hadn’t managed to get on snow until MLK weekend. We fired up Xterrible at 5:36 in the AM and made good time on the highway until we got to Golden on I-70 at which time traffic ground to a crawl. Fast forward three excruciating hours to 8:30 AM, and we found ourselves standing in a humongous line in the A-Basin base lodge hoping to fill up on Huevos Rancheros and bad coffee. Regarding first chair: all hope was long since abandoned.
It was a weak storm anyway, grapes were sour, etc… But before we had unloaded at the top of the BMX we had hatched a plot: drive up the night ahead of the storm, follow the snowiest road as far as it would go, unroll the sleeping bags in the back of Xterrible and crash in place. While all the front-range powder-chasers toil on I-70, we’d be waking up at our leisure, a short drive from the goods.
Line the bed with a heavy wool blanket. Mobile homes are notoriously difficult to heat because there is cold air beneath the floor. Xterrible is no different in this regard.
On top of the blanket: two-man 20-degree synthetic bag for extra cushiness and insulation from the cold.
Inside the 2-man bag: the Therm-A-Rests. Ideally, use two of the insulated blow-up versions. Neither the closed-cell foam nor the uninsulated versions will be as warm.
On top of it all, 10 or 20-degree down bag, or similar.
Crack a window to let all your breath out, otherwise, the inside of the car will turn into a little ice cave and then it will rain on you as you drive away and the car warms up.
The temps were from mid-twenties down to maybe 15 and we were too warm and had to unzip everything in the middle of the night. We could have been comfortable in much colder weather. We’ll be doing this again!
Over Thanksgiving Kelly, her mom Judy and I took a scenic ride through the Colorado backcountry. We were looking for something off the beaten track that we had never seen before and would worth checking out, even if we didnt get much of a chance to get out of the car. I had heard that there was backcountry skiing in the vicinity of the East Portal and Rollins Pass. A dirt road leads all the way to the tunnel terminus, and then a 4×4 road leads up toward the pass. Skiing and hiking opportunities abound from both the portal and along the road up the pass. November was almost entirely without snow, although a few moderate storms rolled through certain areas. We weren’t really sure how far up the pass we’d get so we planned to just play it by ear, picnic wherever the road ended and then head back after a quick reconnoiter.
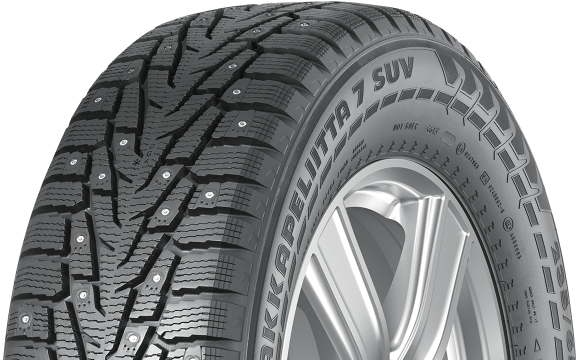
It turns out that there was way more snow than we expected – deep ruts were forming up in the wake of all the big jeeps that had been coming and going. My 5 season old studded Nokian Hakkapeliitta 7 SUV tires and my otherwise unmodified vehicle did so well that I was compelled to write a favorable review.
First things first – everyone makes a big stink about how quickly winter tires wear. I’m on season 5! Granted I have never used this car as a commuter, but this has still exceeded my expectations. Take a look at the stock photos and then the recent photos of the tires for comparison.
Stock Photo
Stock Photo
Season Five
Season Five
Okay, let’s analyze. Clearly there is wear. But from the stock photo you can see 4 distinct wear bars on the shoulder. My photos provide a shot from each of the front and rear tires. They are rotated properly each year, so they are pretty close to one another, though can tell that one pair has worn a bit more. They must have ended up in front for an odd season. In any case, on both front and rear tires you can still make out the 3rd wear bar. On one, it’s pretty close to gone, on the other it’s actually still prominent. So they seem to be less than 50% worn. However wear is not he same as lifespan. Once the 2nd wear bar starts to fade, it’ll be time to think about upgrading. If that coincides with new summer tires, I’d feel fine riding these around in lieu of a summer tire since they still have substantial tread.
Now onto my observations of their performance. As you might expect, it’s possible to slip. That said, I’ve never lost total control with these things. I often find that they will slip briefly before ‘hooking up’ again. It is not uncommon for me to use cruise control with 2WD (rear wheels) on the highway when the road is snow covered. In truly bad conditions (white out, deep snow steep winding roads), 4WD, low gear and a steady hand lend excellent confidence. Last year the state of New Hampshire literally closed the highways due to a blizzard. We didn’t quite get the news in time to change our plans. No sweat…
Since getting these tires I’ve rescued 3 other vehicles from various snow related mishaps. Two of them were substantially larger than my Xterra: an F250 and a Land Rover. The tires get much of the credit – these things can grip!
In the spirit of disclosure I have gotten myself stuck twice. On one occasion it had snowed about 4 feet. I parked on the side of the road and was subsequently plowed in. Other vehicles were parked so closely that I wasn’t comfortable just flooring it. We ended up digging out.
The second occasion, again involved parking roadside in the north country. I thought I was pulling over into some soft snow. The shoulder turned out to be more of a ditch. It took several burly men and 4WD to push it out. If you chock these episodes up to user error, the tires still shine.
Now for some tire eye candy!
Update: Change of plans! The following footage is just from Loveland Pass on a storm day. turns out scrubbing through hours of footage from car rides is slow going! This is still a good sampling of typical driving conditions, but the Rollins pass stuff (more exciting) will have to wait until later. Also, I think I might want to put a bit of effort into that one – might actually turn out to be fun! Stay tuned; I’ll post back here and probably create an independent post as well.
But here’s a quick preview of the Rollins Pass action:
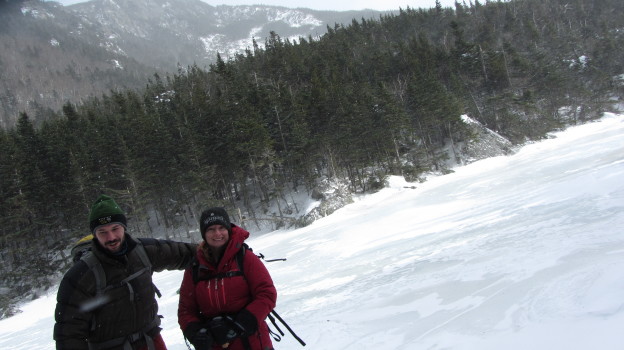
After seeing the promising early season snowpack decimated by the Christmas rain event, Kelly and I opted to skip the resort scene and head out for a light winter hike. Now that we’re committed to a backcountry Montana excursion, some extra conditioning certainly couldn’t hurt. An arctic front was firmly entrenched in the Whites for New Years weekend, bringing with it bitter cold and blustery conditions. Not wishing to repeat our desperate scree-scramble atop Mt. Washington amid gale force winds, we selected a route substantially below treeline: Carter Notch via 19 Mile Brook Trail.
The hike is an 8 mile round trip, out and back. It ascends gently for the first 3 – 3.5 miles, where it briefly climbs over the shoulder of the Wildcat ridge before dipping down in to the Notch. The notch is a pretty spectacular spot: the precipitously steep east flank of the Wildcat Ridge tumbles into two alpine ponds nestled at the bottom of the even steeper Carter Dome. Even though it’s not the majestic summit of some craggy peak, Carter Notch is a worthy day hike destination.
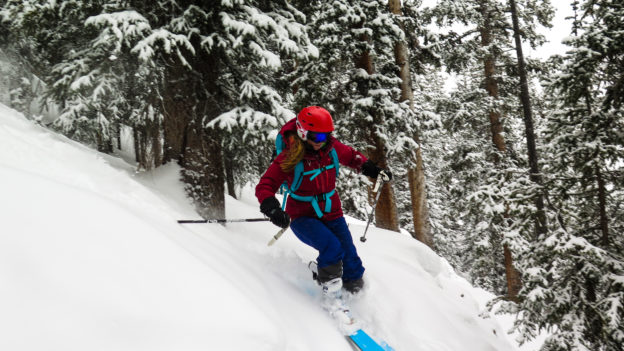
Since we were theoretically trying condition ourselves for the Montana trip, I loaded my 65 L pack up with all sorts of indulgent paraphernalia: puffy pants, a down jacket, down mitts, extra gloves, my shell, a fleece vest, microspikes, crampons, an ice ax, some camera equipment, you get the idea – way more stuff than you need for a low angle, sub-tree-line, day hike. I also brought along my new flexible tripod to experiment with concocting some creative shots in the wilderness. Have a look!
Before Winter 14-15 gets into gear (which seemingly won’t be for a while as of this writing) a couple of nagging issues have to be addressed with our adventure mobile. Firstly, the second generation Xterra in it’s factory configuration tends to bottom out when hauling ass over big potholes and rough roads. No fun when riding to or from the mountains exhausted at 10:30 PM. And second, the infamous Thule tried to sabotage my new carbon fiber skis last winter and such behavior wouldn’t be tolerated again!
The solution to the suspension was simple, however it’s worth giving some backstory. The suspension itself isn’t really bottoming out. I have new aftermarket struts and they seem to have plenty of life in them. After Googling around a bit I discovered that I’m not the first person to complain of this problem (read here and here, or just do some more Googling).
It turns out that the real issue is that there is just not very much clearance between the frame and axle. The factory bumpstops (hunks of rubber which prevent the frame from bouncing directly on the axle) are really firm and frequently collide with the axle giving the passengers a good jolt. One of the suggested solutions (and in my case the least invasive) was to replace the factory bumpstops with an aftermarket set designed to offer progressive resistance, stiffening the ride a bit and smoothing big jolts. You can read more about the solution here and find a solution for your own SUV here. It’s theoretically a simple install, involving only a few wrenches and some bolts, but after many New England winters my undercarriage was so ornery that it needed a professional touch.
The Thule required a bit more engineering. At some point last season my brand new DPS Wailer 99s rattled around in the roof box enough to severely damage one of the tips. After a good deal of staring at my crummy old second-hand Thule Mountaineer, drawing, speculating, measuring and theorizing, we devised a plan. And then we scrapped the original plan and did something else altogether.
The requirements were simple: we had to be able to easily toss at least 4 pairs of skis into the box in such a way that they would not shift around in transit. Thule and other have already solved this problem with their flat top style carriers, but I’ve never liked the idea of sandblasting your skis for 2 – 4 hours while en route to the mountain.
The solution was something of a hybrid between the flat tops and the existing box: we fashioned a set of bars which would mount inside the box and clamp down on 4 pairs of skis when closed. The obvious trade off is that only 4 pairs of skis can ride up top now. Seems like a fair trade off for peace of mind and longevity of equipment. Here’s a run down of the action:
The patient, looking rather surly.
Home gym flooring found at Home Depot, used to sandwich the skis between the lumber.
A 2″x6″ cut to size, beveled with a jigsaw and wrapped in strips of the home gym material.
Bolting the bottom braces into the Thule. We placed two bolts on the bottom and one on each side. The sides were strangely shaped, so shims were cut to size and wedged into place to consume the extra space.
Screwing the bottoms in…
Notice that the rubber mats are bolted on the sides of the lumber so that the bolts don’t contact the skis.
More eye candy…
Finished product with some big skis, for show. Also, notice the top rails. Those are 2″x4″s ripped in half and wrapped in the same rubber mat material. These are simply bolted on each end.