In the spirit of the recent post regarding testing my winter load-out, I decided to document my various winter preparation activities just in case any of this eclectic trivia or minutia should be of use to anyone else out there. (And judging by the searches by which people seem to arrive at this site, at least some of this might be useful information…) So, here’s the first topic in the Winter Readiness series: How to install a set of AT Sole Blocks on the Black Diamond Factor boot.
First, let’s have a quick look at all of the moving parts:
 |
| Exploded: Boots, blocks, hardware, liners. |
 |
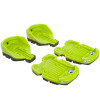
Close up: the alpine blocks to the left, the AT blocks to the right and
the included hardware in the center. |
I’ll assume most people will have purchased the boots with the Alpine block pre-installed (at least that’s what happened in my case). In any event, the process of removing and replacing the either set of blocks is identical.
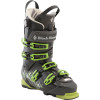
The first step in removing the sole blocks is to unbuckle everything, remove the liner, yank out the boot board, and flip them into walk mode, just for some extra wiggle room.
 |
| Das Boot. |
 |
| Unbuckle and unstrap. |
 |
| Remove liners and boot boards. |
 |
| Flip into walk mode. |
The next item on the agenda is to remove the alpine blocks by unscrewing them and prying them off of the boot. Let’s first take a closer look at the hardware involved.
 |
Button heads with #2 Philips fittings and flat heads with Allen wrench
fittings. |
 |
Number 2 Philips driver, included Allen
wrench, a hammer, the screws. |
To remove the toe pieces unscrew the two machined flat heads near the toe welts using the included Allen wrench. Pry upward on the toe welt of the sole block. With enough force it will pop loose, allowing you to pull the toe block backward and completely clear of the molded plastic fittings.
 |
| Unscrew with Allen wrench. |
 |
| Pull upward on the toe welt. |
 |
With the toe loosened, pull back on the entire block until it breaks free of
the molded plastic fittings shown below. |
 |
| One down, four to go! |
Next step: remove the heel piece. This requires that you locate the two #2 Philips head screws under the boot-board and back them out. Once this is accomplished, you can bang the block off of the boot with a few carefully placed hammer swings.
 |
| Back out the two heel piece screws. |
 |
Hammer the heel piece off. Fairly careful aim is required to have any effect:
you want to be sure to strike only the heel piece or else the sole of the boot
will absorb the force rather than the heel block. |
 |
Enlarge to see the heel block has slid off of it’s molded fittings on the boot.
It can simply be pulled off now. |
While you’re at it, you should probably repeat this process on the other boot. Now to put the AT blocks on. Let’s have a close look at those:
 |
A careful inspection of the sole blocks reveals that each is labeled with a
capital R or L |
We’ll start with the toes. Be sure to grab the correct block. Fit the rear portion of the toe block over the plastic moldings just forward of the middle of the boot – they should hook on. Once the rear of the toe block is firmly hooked on, press down on the toe block over the toe welt until it snaps into place. Finally, the toe piece can be locked down using the two flat head screws fitted for the Allen wrench.
 |
Place the heel block over the plastic moldings and press forward until the
toe piece is firmly seated. |
 |
| Press down over the toe welt until the toe block snaps into place. |
 |
| Lock it down using the two flat head screws with the Allen wrench. |
Next step: the heel block. Grab the appropriate heel block and slide it forward ensuring first that the forward grooves are seated correctly, and second that the rearward grooves follow into place. You should see any gaps between the heel piece and the boot if this has been done correctly. You may need to persuade the heel piece into position with a few hammer swings. Once it’s in place, you can drop the two Philips head screws into place from the top of the boot and crank them down using a #2 screw driver.
 |
Slide the heel block over the molded grooves near the boot center, and then
be sure that the rear grooves have followed into place. |
 |
| You need to exert a bit of downward pressure to keep the grooves lined up. |
 |
| Finally bang things into place with a few hammer strikes. |
 |
| Replace the two Philips head screws and tighten them. |
Repeat this process on the second boot. Replace the boot boards, the liners and buckle things up again (boots keep their form best with all buckles and straps secured during storage).
|
| Done! |
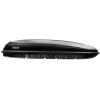
And with one less Winter Readiness chore checked off my list, I think I’ll kick back with some light Sunday afternoon reading…
 |
| Should be a good winter! |
Gear List (click links for more product info):