Hell On Wheels!

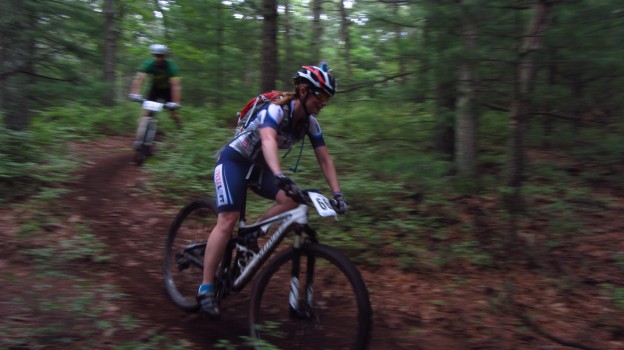
A new sport graces the pages of 1water1coffee1beer: mountain biking!  Kelly talked me into this madness over the spring and it’s getting to be nearly as much of an addiction as skiing – and that’s saying something.  A few weekends ago, Kelly was in a race, and I decided to get creative with some cameras and gadgets.  After consulting Dad I set up my Canon point-and-shoot to a low ISO and a f-stop of 1/60 or 1/40; if you can manage to track the target during the exposure, you can get a relatively clear subject and a blurred background, giving the feel of rapid motion.  It’s going to take some practice, but some early action shots are below.

Also thrown into the mix is some remote controlled GoPro.  By hanging the GoPro from a tree and posting up, down the trail a bit, I could snag a few stills with my point-and-shoot before firing a 30-shot burst from the GoPro using the Android app, allowing me to capture a few choice angles of the action without having to be everywhere at once.  Check it out!

DCIM100GOPRO

Remote GoPro

IMG_6982

All smiles!

IMG_6984

These two are clearly having a blast…

IMG_6995

FYI, her bib is definitely 666…

IMG_6985

Dangerous curves?

Bagging the End of the AT

Just before the 4th,  Rob, Sweeney and I were up with friends rafting near Baxter State Park.  Though the camping weather was overly moist, the rafting was a blast.  That night Rob and I set our sights on peak bagging Katahdin.

We were heading out around 8 when our friend Ben showed up and we all drove off into Baxter. The hike began under cloudy skies into dense fog up from Abol campground.  We quickly rose above treeline where the trail followed a rock slide and led us up one of the steepest continual ascent we’ve encountered since Great Gulf.

Poor visibility at the summit

Ben and I get the age old shot…even through we didn’t thru-hike

We summitted the nearly 4000 vertical gain in two hours flat.  On the way up we’d decided to loop the hike by descending via the AT to expedite our trip.

Katahdin

Rob above the Knife edge

Katadhin - 6
Katadhin - 5

Heading down the AT was definitely the right choice as we were awarded great views and stopped briefly to chat with an early season thru-hiker.  I pulled my phone out to snap photos only a few times as we made our way down.

Katadhin - 14 Katadhin - 3  Katadhin - 7

We made the 9 mile loop in 4.5 hours but were still 2.2 miles from our car, which put us back at the rafting lodge a little later than we’d anticipated.  Rob jogged and we speed walked to the car, very satisfied to have finally hiked Katahdin.


Go Outdoors, Whatever the Weather May Bring

Catherine:  Back in early May, despite the weather reports, Andrew and I decided that we would go through with our plan to bike and camp the Cape Cod Rail Trail; a 26-mile route that goes from Dennis to Wellfleet. The weather didn’t lie, and it rained a lot, although we had pretty good luck with timing. We were able to set up our tent site at Nickerson State Park right before it downpoured. But then it basically rained the entire rest of our trip – stopping, of course, as soon as we reached the car Sunday morning.

IMG_0756

Our campsite arrival

IMG_0812

IMG_0760

After setting up our site


IMG_0766

Reaching Coast Guard beach


IMG_0776

IMG_0777

Andrew’s fire starting skills were tested in the rain, and he passed.

IMG_0784

Andrew: Biking in and out of Nickerson was the hilliest part, but after we diverged from the rail trail and headed for Coast Guard beach was when it really turned into an adventure.  The winds picked up and threatened to blow us over.

We met up with some of Catherine’s friends in the evening who were kind enough to provide us with comfort foods: delicious snacks and beers.

All in all a great weekend, despite the rain.

Glitch in the Matrix

When one of your adventuring vehicles has problems, you have several options. In the interest of saving money for an upcoming Seattle/Portland trip, Catherine and I opted for the do-it-yourself discbrake/rotor repair.

We bought the parts, and with the right Autozone tool rentals, got the job done without too much trouble. To give a quick run down:

CameraZOOM-20130330152725447

Catherine loosens the tires.

CameraZOOM-20130330151634631

Jack the car up. Chock the wheels. Put it in neutral. Read the manual for this one since I wasn’t familiar with Catherine’s car.

photo 1

Me unbolting the caliper after removing a tire. Remove the worn pads. If the rotor shows signs of improper wear (It shouldn’t), replace it.

photo 5

Compress the brake caliper. For rear brake calipers that require a twist to compress, rent the tool from Autozone. You did rent it right?


photo 2

Compressing the front caliper with a C clamp


photo 3

Unusual wear from only the driver’s side rear pads, which tore up the rotor.

CameraZOOM-20130504145749258

To replace the rotor, unbolt the caliper bracket, and then use a bolt from the caliper screwed into the rotor to pop it off the axle. Then seat the new (cleaned) rotor, and re-assemble. Before you replace rotors, make sure to clean the new ones.

photo 4

Secure new pads into the bracket, and apply sound dampener (the orange glue). Re-attach the caliper, and then put the wheel back on, tightening the bolts evenly to 100 foot lbs.

The first try it took us a second trip to Autozone to acquire the brake tool, and we ran out of time. Our second attempt, while doing the rear wheels, went incredibly smoothly, especially considering there is no Haynes manual for her car. Working with someone else on a job like this helps as well.