Winter Readiness: The Daily Driver

Update: Don’t Buy K2 Skis!

These suckers delaminated after just a few weekends of use.  One or two days after they first started to delam, a whole chunk of base material fell away right next to the blown edge.  I thought I’d get away with skiing them for the rest of season, but the damage spiraled downhill so quickly that I decided to send them back to K2 before it got any worse.  When K2 got ahold of them, they just couldn’t believe that the edge separated before the base material started to fall off and assumed that must have hit something really hard.  To my recollection, I never hit anything and the specific order of events was 1) delam and 2) base falls off.  In any event, they only lasted like 12 days (tops) and now their collecting dust in the K2 warehouse.  I’m done with K2 skis, as this is the second pair I’ve owned with lasted less than 20 days on snow.  Not sure what the hell I’m gonna do with Hardside Custom skis – maybe REI will take them back, because I surely have no use for them now.

Continue reading

Winter Readiness: Thule Mountaineer on Factory Xterra Crossbars

‘Tis the season!  With the first weekend of skiing already come and gone, it seemed high time to get the Thule strapped to the roof again.  In truth, I wanted to get this done before Thanksgiving, but this turned out to be more of an ordeal than one might imagine.  For posterity, the details are documented below.

The original set of mounting hardware finally succumbed to age and the elements, so I junked that stuff, and decided to replace it with new components.  Locating the correct set of replacement parts was the first hurdle.  The Thule website seems to list only one model of Mountaineer.  I made the incorrect assumption, that this must be the only model, and that the parts under the Mountaineer Spare Parts tab would be compatibly with my box.  Indeed there are at least two cargo boxes bearing this name, albeit with different arbitrary letters and numbers at the end.

Before ordering anything from the Thule website, determine which box you have!  According to Thule, the model number and date of manufacture is listed on a sticker on the inside of the box…  After God knows how many years of abuse (my box is second hand), no such sticker was to be found.  You can determine which of two you have by measuring the hole spread of the mounting holes drilled in the bottom of the box.  The spread on the box linked above is 3 1/4 inches.  The hole spreads on the box unlisted on their website (the one I have, apparently ) is 3 11/16 inches.  After the exchange of several e-mails, Thule shipped me the correct parts, and I returned the incorrect parts.  I could not find them on the Thule website, but are available from other retailers.  Why might this be?  One can only speculate, but planned obsolescence jumps to mind rather quickly in the absence of any rational explanation…

Armed with the correct replacement parts, I began the next phase of this roof rack adventure: getting the damn thing attached to the car.  Yet again, this was less than straight forward.  My adventuring vehicle of choice these days (and likely for the next 150,000 miles) is an ’07 Nissan Xterra.  The Xterra is a superlative light truck for the amateur adventurer, armed to the tooth with all sorts bells and whistles aimed squarely at the die hard weekend warrior, yet has one aggravating short coming: the factory cross bars are of cartoonishly large proportions.  No doubt, some fool in marketing got his way, arguing that they would look more burly in glossy brochures and TV ads.  In any event, most roof racks aren’t really built like this, and the replacement parts (shown below) do not quite wrap around these industrial sized crossbars.

Solutions to this dilemma include the following:
  • Skip some parts.
  • Spend more money.
  • Custom mods!
Last time around, I opted to skip the lock washers (part E above), and the foam pads (part K).  In hindsight, this was a decision of dubious merit.  They probably include those parts for a reason…
In the spending more money category, Thule offers a bewildering array of adapter kits, which probably work just great.  The appropriate parts (I think) for this job are linked below in the Gear List.  However, when one has as vicious an adventuring habit as I do, every dollar counts, and thrift becomes the order of the day.
On that note, my dad and I decided to test our luck, with some power tools.  Since the additional stack height of a lock washer and two foam pads is hardly more than a few millimeters, and evidently all the difference needed to get the nuts threaded onto the carriage bolts, we reasoned that we could just shorten the plastic sheath that covers the threads on the plastic nuts (part J).  The steel threads are recessed fairly deeply inside of the plastic knob, so there is plenty of wiggle room before anything important gets wrecked.  We took all 8 nuts to down to the basement and belt sanded a few millimeters off the bottom of them, and presto!  Cookin’ with gas!


Gear List (click links for more product info):

REI Gear ShopFree Shipping on Orders over $50

Thule Mountaineer ESThule XAdapt9

Grep Prep: Swap Plate Mounting

It’s possible you’ve heard of binding swap plates before.  It’s also possible you’ve even mounted swap plates to your skis a number of times.  If so, this might be old hat to you, but personally this is only the third mount I’ve done.

For anyone new to swap plates: swap plates are machined pieces of aluminum that allow you to swap multiple sets of bindings onto a single pair of skis, such as switching between Tech bindings (Dynafits) and in-bounds or side-country bindings.

Disclaimer:  I’ve never mounted plates before, so I thought it would be useful to document my process. I don’t have any background as a ski technician or working in ski shops, but I do want my skis to be set up as exact and perfect as possible, so I was incredibly careful.  It was definitely a measure a whole ton, drill once, situation.

This year I picked up two new pairs of skis: I perhaps optimistically got a pair of used Praxis Powderboards, and a brand new pair of Blizzard Bonafides.  I’m pretty amped up about both pairs, and my initial reaction to the Bonafides is that there’s nothing not to like, though the real test will be when some big storms hit and touring season begins.  I wanted to dial in both setups and be able to swap my pair of Rossignol 10-18 Axial2s between them, while being able to mount Dynafits as well.  Luckily, Binding Freedom came out with DynaLook plates for just this purpose.

Binding Freedom’s plates come with everything needed for mounting except a drill.  The included templates work great for lining everything up.  I used them last year when Rob helped me mount Fritschi’s on my Helidaddys.

Prior to setting up my own skis, I refreshed my memory using Brian’s post about inserting quiver killers.

Mounting Process

Alright, enough rambling.  Here’s the step by step process for mounting plates to your skis properly:

Before beginning: Grab a drill, bits, a posi-driver (#3 philips screw driver), a hammer, something to punch starter holes with, scissors, masking tape, a sharpie/pen, a ruler, clamps, and a sturdy table to clamp to.

Lay the first ski on the table.

1.  Find the center line on the ski, and determine where you want to mount relative to the line.  Center marking on boot on the line is fine in many cases.  Mark it with a sharpie.

2.  Find the center of the center line, to properly line up the center of the paper template.

3. Cut excess paper off the template, and tape it together at the correct BSL.  It’s also a good idea to cut notches near the BSL marking to properly line the center of the template up with the center of the ski.  I also cut a square out of the center of the template to reveal the markings I’d made underneath.

PlateTemplate

Ski with template cut and taped in a roughly correct position. Notice the sharpie marks at the center line, and the hole cut at the center line.

Template close-up

Close-up of the template.

4.  Do lots of measuring.  Make sure that at least each end, and the center is centered on the ski, aka equidistant from the edge.  I used a T-square and made measurements from the center of each hole to the edge.  As you get the template in the correct spot, tape it to the ski with masking tape.

T-square measuring

T-square measuring each hole position.

5.  Center punch each hole.  Mark it if you want for easier location.

6.  Carefully remove the template.  You’ll want to reuse this for the next ski.  You might want to line up the plates on your hole marks after this to ensure you didn’t miss.

7.  Clamp the ski down.

Clamped and ready for drilling.

Marked center punch marks

Marked center punch marks

8.  Tape a stopper on the bit or use a bit with a catch sleeve, so that you don’t drill too deep.  You certainly don’t want to drill all the way through the ski.

Masking tape depth guide based off the screw length.

9. Drill pilot holes, using something lke a 3/32″ bit.  This is especially important for skis with metal so that the bit doesn’t walk over the topsheet.

Toe piece pilot holes drilled.

Toe piece pilot holes drilled.

10.  Re-drill with the larger bit.

11. Grab the plates and mount them.  Use some sort of adhesive such as super glue, just a bit on each screw to hold it in.

Plate with marked punches.

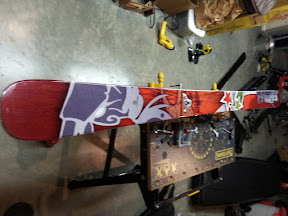
Another look at the plates lined up before drilling.

12. Repeat for the second ski.

Done!

Completed plate mounting!

Completed plate mounting!

I’ve tested the new setup on the hill, and so far I’ve been happy with my efforts.  Everything seems to be holding together well.

Bring on the snow!

Snowliage

There, I’ve said it: snowliage.  That’s precisely what it was, and why we were there.  We saw some pretty ripe leaves, some frosted peaks, and some blue skies and generally spent some quality time in the mountains getting stoked for the snow season!  Eye candy was produced in abundance.