Last looks at Fall climbing

Despite the pile of work fall classes are handing me, I managed to get down to the Quarries twice this weekend.  The fall scenery was a breath of fresh air after spending nearly every waking hour last week indoors working.

I’m excited for the coming ski season, which has in some cases already begun.  However, I hope there are a few more good climbing weekends like this one where it’s a sunny but cool 50 degrees.

The quarry has been busy lately, which lead me and my friends to seek out some new routes, but we managed to revisit a few good ones as well.  With daylight savings over, darkness caught us in the quarry unexpectedly early.

Winter Readiness: Black Diamond Factor AT Sole Block Install

In the spirit of the recent post regarding testing my winter load-out, I decided to document my various winter preparation activities just in case any of this eclectic trivia or minutia should be of use to anyone else out there. (And judging by the searches by which people seem to arrive at this site, at least some of this might be useful information…) So, here’s the first topic in the Winter Readiness series: How to install a set of AT Sole Blocks on the Black Diamond Factor boot.


First, let’s have a quick look at all of the moving parts:

Exploded: Boots, blocks, hardware, liners.
Close up: the alpine blocks to the left, the AT blocks to the right and
the included hardware in the center.

I’ll assume most people will have purchased the boots with the Alpine block pre-installed (at least that’s what happened in my case).  In any event, the process of removing and replacing the either set of blocks is identical.

The first step in removing the sole blocks is to unbuckle everything, remove the liner, yank out the boot board, and flip them into walk mode, just for some extra wiggle room.

Das Boot.
Unbuckle and unstrap.
Remove liners and boot boards.
Flip into walk mode.

The next item on the agenda is to remove the alpine blocks by unscrewing them and prying them off of the boot.  Let’s first take a closer look at the hardware involved.

Button heads with #2 Philips fittings and flat heads with Allen wrench
fittings.
Number 2 Philips driver, included Allen
wrench, a hammer, the screws.

To remove the toe pieces unscrew the two machined flat heads near the toe welts using the included Allen wrench.  Pry upward on the toe welt of the sole block.  With enough force it will pop loose, allowing you to pull the toe block backward and completely clear of the molded plastic fittings.

Unscrew with Allen wrench.
Pull upward on the toe welt.
With the toe loosened, pull back on the entire block until it breaks free of
the molded plastic fittings shown below.
One down, four to go!

Next step: remove the heel piece.  This requires that you locate the two #2 Philips head screws under the boot-board and back them out.  Once this is accomplished, you can bang the block off of the boot with a few carefully placed hammer swings.

Back out the two heel piece screws.
Hammer the heel piece off.  Fairly careful aim is required to have any effect:
you want to be sure to strike only the heel piece or else the sole of the boot
will absorb the force rather than the heel block.


Enlarge to see the heel block has slid off of it’s molded fittings on the boot.
It can simply be pulled off now.

While you’re at it, you should probably repeat this process on the other boot.  Now to put the AT blocks on.  Let’s have a close look at those:

A careful inspection of the sole blocks reveals that each is labeled with a
capital R or L

We’ll start with the toes.  Be sure to grab the correct block.  Fit the rear portion of the toe block over the plastic moldings just forward of the middle of the boot – they should hook on.  Once the rear of the toe block is firmly hooked on, press down on the toe block over the toe welt until it snaps into place.  Finally, the toe piece can be locked down using the two flat head screws fitted for the Allen wrench.

Place the heel block over the plastic moldings and press forward until the
toe piece is firmly seated.


Press down over the toe welt until the toe block snaps into place.
Lock it down using the two flat head screws with the Allen wrench.

Next step: the heel block.  Grab the appropriate heel block and slide it forward ensuring first that the forward grooves are seated correctly, and second that the rearward grooves follow into place.  You should see any gaps between the heel piece and the boot if this has been done correctly.  You may need to persuade the heel piece into position with a few hammer swings.  Once it’s in place, you can drop the two Philips head screws into place from the top of the boot and crank them down using a #2 screw driver.

Slide the heel block over the molded grooves near the boot center, and then
be sure that the rear grooves have followed into place.
You need to exert a bit of downward pressure to keep the grooves lined up.
Finally bang things into place with a few hammer strikes.
Replace the two Philips head screws and tighten them.

Repeat this process on the second boot.  Replace the boot boards, the liners and buckle things up again (boots keep their form best with all buckles and straps secured during storage).

Done!

And with one less Winter Readiness chore checked off my list, I think I’ll kick back with some light Sunday afternoon reading…

Should be a good winter!

Gear List (click links for more product info):
Black Diamond Factor 130 Alpine Touring Boot - Men's Black/Envy Green, 27.5Black Diamond AT Sole Block Envy Green, L Free Shipping on Orders over $50

Camel’s Hump

The weekend following the Bigelows I was planning to visit my sister up in Burlington.  Originally I’d wanted to do a brief overnight, but due to the weather and a slight lack of time, we turned it into a nice day hike.

Camel’s Hump is Vermont’s third highest peak, but it seems there might be a bit of debate over that.  I didn’t get a good look at the distinct shape until I was heading back to Boston, when it was clearer, but it stands clearly above the surrounding mountains. Unfortunately I failed to get a good photo of it before it was out of sight.

The previous evening it rained pretty heavily, but luckily we only caught wind and fog.  We started on the western side, on the Burrows trail, with a link up to the Long trail.  I’d read that the eastern Camel’s hump road was still closed after damage by hurricane Irene.  The western side ascends a little more steeply, but it made for a great hike, and despite the fog we caught a few good views.  The peak had a stiff wind, but as we descended, the sun came out and it turned into a beautiful fall day.

One of the few breaks in the clouds.


Not much to look at behind me.


My sister next to the survey marker on the peak.

In the end the hike was the perfect length.  We got to stretch our legs and still have time to head in to Burlington for an afternoon lunch.


The Bigelow Adventure

This outstanding trip may have been my favorite hiking trip of the year to date.  Sweeney has already posted his take of the excursion, though I have a few notes and photos to add myself.

The trip itself was thought up by Sweeney when he and a friend hiked part of the range last year, so he had more accurate expectations of what we’d encounter.  The plan was to drive up Friday, stow the kayaks at the eastern end of Lake Flagstaff, then drive to the other end of the range, and camp out near the lake.  We’d hike the range with all our gear Saturday, and then kayak back Sunday, leaving some extra time on Monday in case we didn’t make it all the way.

In end the, nothing went as planned, but everything worked out extremely well.

Friday

Sweeney’s account of Friday does a great job of describing our adventure, which began a little sooner than I was expecting.  We gave my Pathfinder a good workout on the 4×4 roads near the lake, and it’s a good thing it was up to the challenge.  After fair bit of driving and scouting for the campground in the car and on foot, I was glad to finally pitch our tents for the night and have a few beers.

Saturday

I’ve been pairing down my back packing gear for a trip just like this, so I was pysched to have reason to bring it on the trail.  I was not as interested in bringing my 70L internal frame pack when I only had ~35L of gear to put in it, so I borrowed Sweeney’s extra REI pack, which was much smaller, and fit everything perfectly.  Since this was my first overnight of the year where we’d be on the trail, I really had a chance to test out some new purchases.  My Big Agnes 2-man packed well, and I enjoyed the smaller, lighter sleeping bag and half-length pad I’d brought. We only shared our food and cooking system, otherwise we were pretty much soloing in terms of gear carried, which made for a good test, and allowed us some extra comfort.

I swear the leaves were colorful. Just not as colorful as bright orange.

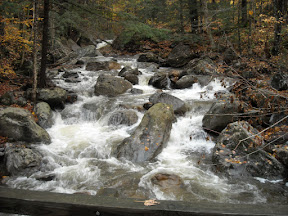
The hike started slow but about three miles in we peaked Cranberry Mt. and got some great views of the lake and the rest of the range, the first of many.  The foliage was in full color, but it’s a little hard to tell with Sweeney’s shirt out shining the color of the leaves.

Around Cranberry we ran into two guys doing the same trip as us, but in the opposite direction.  They’d camped at the Horns, about half way, the night before.  It was cool to hear that some others thought it’d be a sweet idea to do the traverse and then return by boat, but we didn’t run into them on the lake the next day.

On top of Cranberry, looking at Cranberry pond below, and the Horns ahead.

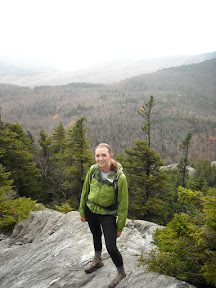
Sweeney, looking satisfied with the views.

Next was North Horn, one of a pair of steeply pointed peaks.  We heard from a few sources that Horn’s pond, a glacial pond on the eastern side, has some great Trout fishing.  Based on the number of fish rising while we were there, I’d love go to back and catch a few, but it’s a small pond, so it’s hard to say how many fish there are in it.

West Peak, with Avery not too far away.

We trekked on to West peak, the first over 4000, and made sure to pick up the pace to Avery, the last peak before we descended and took a fork to leave the AT and head for the Round Barn campground, where our kayaks were.  We caught the sun setting on the windy rock on top Avery, and by the time we reached the trial junction 2 miles down, it was dark in the dense woods, despite the bright light of the moon.

Caught in the shadow of Avery, looking at Little Bigelow. The AT continues to follow the smaller mountains.

The campground was a maze of pine needles and more crowded than we expected, but we got settled in and had some time to unwind and enjoy the evening.

Sunday

This was the part of the trip that was a bit questionable.  It’s been awhile since I’ve kayaked, never with gear, and never in Sweeney’s boats.  The weather, and wind would also factor into whether we’d make the trip in one trip.  We got a late start after repacking our gear and getting everything situated in the kayaks.

Even with a strong head wind that followed us the whole day. and some patches of rough water with white caps, it was a beautiful day to be on the water.  It was clear, sunny, with just a bit of haze.

Sweeney had his GoPro snap a ton of photos. but I managed to get a few of the range.

As we rounded the last corner for the last 1/3 of the trip, we got a great view of the entire ridge we’d hiked the day before.  From left to right is Avery, West, the Horns, and then Cranberry.

We made good time and finished the kayak ahead of schedule, even with a few stops.  That meant we still had time to head to the bar Sunday night and then find a place to camp.

Monday

We’d headed partway back along the ridge to camp near another ‘road’ that lead to Stratton Pond, which was a great scene to wake to up.  After packing up we, a bit unwillingly, headed back to MA to drop off the gear.

The Pathfinder, just before we unloaded the kayaks.