Another winter has come and gone, and before too much of it fades from memory, I thought I’d share some of the tips I picked up along the way. None of it is especially profound, but who knows, maybe some of it will be useful to some one out there.
Black Diamond Ski Strap
Usage 1: Climbing Skin Melt-down
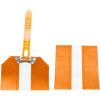
I have determined that it is not possible to overstate the usefulness of the Black Diamond Ski Strap to the back-country skier, especially the longer lengths. Before I elaborate, let me stress the importance of carrying two of them and of getting the long ones. They hardly weigh anything, so no quibbling about ounces! In this case the added value is worth the 2 extra calories you’ll burn schlepping them up to the top of some mountain. I’ll present my most compelling argument first…

Evidently, all three screws ripped out of the material simultaneously…
This past March, on mile 1.5 of our 5 day hut tour in the Wallowas, during the execution of a lazy AVA turn, I somehow managed to kick the tip loop of my brand new (as in not used once ever) Black Diamond Ascension Split Skin clean out of the skin, resulting in no less than 2 cougar screams (in the words of Colin Fletcher) and a short profusion of swearing. Observe:
I briefly considered duct tape, and then briefly considered backing the screws out of the tip loop, cutting the damaged end of the skin off and re-trimming the entire length of it in the field with a pocket knife and trying to reattach the tip loop to the fresh end of the skin. Fortunately, before I tried any of these Mickey Mouse schemes I thought of just wrapping a ski strap around the loose end of the ski. I’m sure I’m not the first person to have thought of this, but if you have any doubts about the feasibility of this technique, consider that this was the technique that got me through the entire rest of the season! The ski strap did suffer a few nicks around right around the edge of the skis, but has not failed. Even so, the possibility of that failure has led me to believe that carrying an extra strap just in case is a worthwhile insurance policy while on any extended tours.

Ski strap with buckle on top. On a decently rockered ski, the strap won’t really contact the snow.

Tuck the loose end under the top so that it doesn’t drag and get run over by the other ski.
Usage 2: Emergency Booster Strap
Now here’s one that I haven’t actually heard of from anyone else. I can’t personally vouch for it’s effectiveness, though during our Wallowa Alpine Hut trip, Karl claimed that it was somewhat helpful. He was using borrowed AT boots and found them to be too soft to effectively steer a big pair of skis through heavy snow. The setup was starting to ruin his day, and this was the best I could think of at the time. I theorized that some added rigidity might stiffen up the spine of the boot. It sounds like this was only marginally successful for him as his boots were really just too soft for him. However, you have to bring at least one ski strap with you anyway, add an extra and you have at least something to fall back on in the event that you tear out a buckle post-holing near a big rock or experience some other kind of equipment failure while off the beaten path.

Hotronic Foot Warmers
I used to think that boot warmers were only for city slickers, ski bunnies in poofy jackets with fur hoods, old people and other individuals not exerting themselves enough to produce any body heat while on the slopes. I now realize that they are in fact for ski bums who want to be able to ski bell-to-bell after the Arctic Oscillation dumps an eye-balls deep blanket of snow on top of Jay and tops it off with an ambient temperature of zero degrees Fahrenheit and 40 mph winds without getting yet another case of first degree frostbite.

The bite of frost, depicted in graphic detail. Notice the swelling, even on the normal colored toes.

They’re actually on the upswing here. After about an hour or so of being under a warm blanket the colored started to come back the blood started to effuse.

They some times go numb during long hikes…
With our Wallowas trip already reserved and mostly paid for, the only reasonable decision was to pick up some boot warmers and play it safe for the foreseeable future. The crux of the whole setup is getting the 4 cell batteries and the extension cords. I drop the extension cords down each pant leg, tie the extension into a simple knot and leave the batteries either in my pants pockets or clipped to my belt. The belt is easily the more comfortable and convenient location, however storing them in a pocket should theoretically increase the battery life. On low power, the 4 cell battery has lasted me all day. Just having the option of instant heat alleviates a significant amount of stress during a long day in the mountains. They’re worth the price tag.

Virtually no chance of the extension cord pulling out and snaking up your
pant leg.
Booster Straps
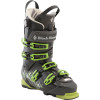
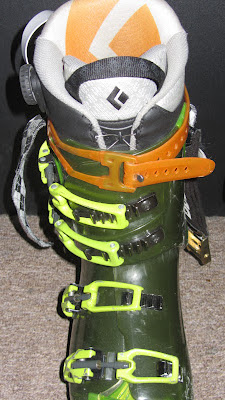
These are among my favorite purchases of the ski season. For some reason, these aftermarket replacement straps seem to be most popular among the ski-racing culture and less so in the AT and back-country crowd. Usually back-country shops have never heard of them, and when I walked into the local race shop with my BD Factor’s to get Booster Straps installed, the boot tech had never even heard of Factors… Clearly some cross-pollination is needed. In any case, the leverage you are able to apply to the jam cleats on these things really lets you get them as tight as you could possibly want. The slight give in the elastic bands gives you a really smooth flex and stiffens toward the end of the range, eliminates shin bang, and generally gives me considerably greater confidence in my boots. They come in several stiffness-es: Junior, Intermediate, Expert and World Cup. I went with the Expert on my Lange Comp Pro 120s and the World Cup on the DB Factor 130s. I swear to Ullr, the World Cup straps stiffened the Factors up to the point that they’re comparable to the Langes!

Nokian Hakka 7 SUV Studded
Last, but by no means least, if you intent to chase storms and can possibly scrounge up the cash (or get another credit card) just get yourself the top of the line kicks for your ride. Your frayed nerves will thank you in years not taken off the end of your life after countless white-knuckle rides through mountain passes in dim light. In all seriousness my only concern with these tires is getting rear-ended by people who can’t stop as quickly. The road noise is totally negligible and even with no snow on the ground, they feel as though they give a much more precise ride than the all-weather tires my car came with. And they look pretty sweet, too.
Gear List (click links for more product info):